
Monday 12 December 2011
Santa Bags
Another simple idea for Christmas is buying som mini Santa chocolates and making a bag tag for it. All I did was use the Sweet Shoppe Alphabet and punched out the letters and then used the star from Jolly Bingo Bits in Real Red. I think kids really like seeing something with their own name on it.

Reindeer Food

People still have birthdays in December
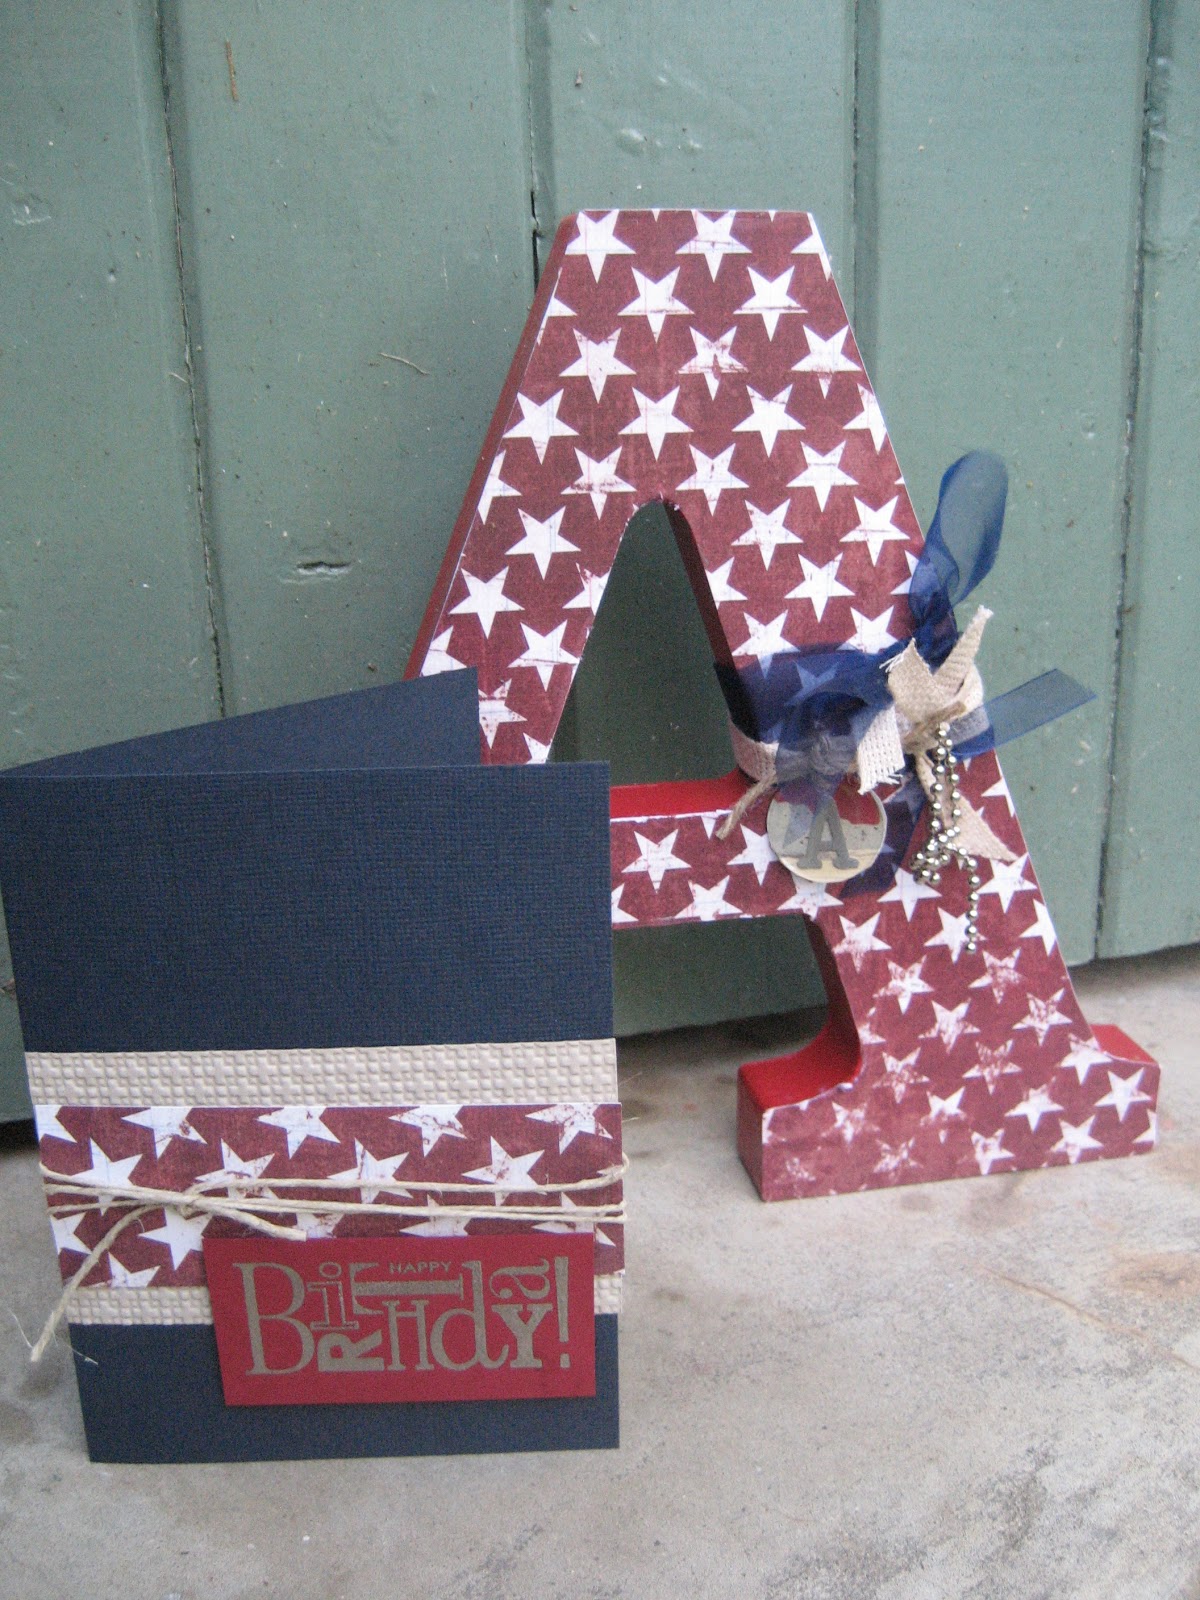
Do you have a friend that has a birthday in December? My poor sister is a December baby and always hated it when people said "This present is for your birthday and Christmas combined." So when I was making a present for a young boy I know, I made sure his birthday was very separate from his Christmas present.

I made him a wooden letter and made a matching card. For the card, I decided to use my Stampin'Up! pewter embossing powder and a greeting from the Hostess Set So Many Birthdays. I must say, I was doubtful that the powder ould pick up something as fine and intricate as the 'Happy' on the stamp, but have a look at the close up- it worked perfectly.


I made him a wooden letter and made a matching card. For the card, I decided to use my Stampin'Up! pewter embossing powder and a greeting from the Hostess Set So Many Birthdays. I must say, I was doubtful that the powder ould pick up something as fine and intricate as the 'Happy' on the stamp, but have a look at the close up- it worked perfectly.

Sunday 11 December 2011
The end of an era
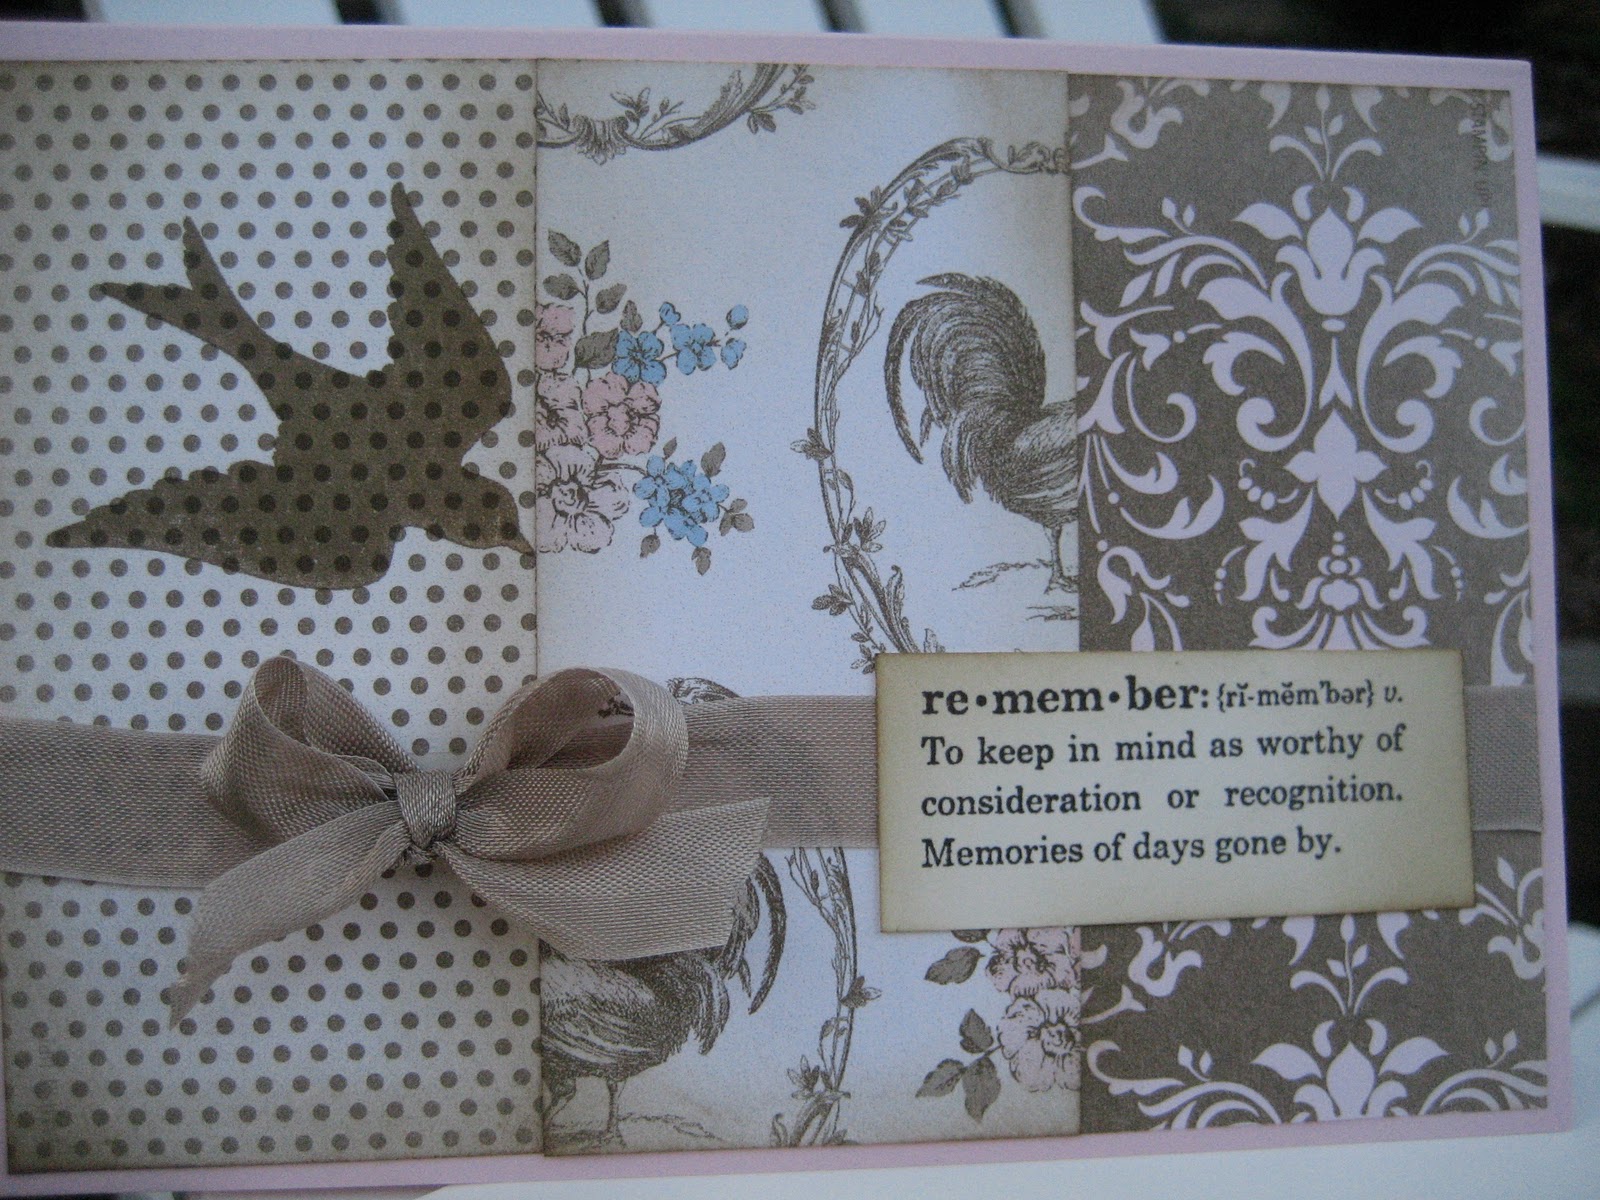
Three lovely girls I know are 'graduating' Primary School. I put the word in inverted commas as I don't know if you technically graduate or just finish. Anyway, 2 girls I tutor, (Amelia and Amelia!!) and my niece Sophie are all finishing up any day now. I made them each a card to mark the occasion.

 I was trying to think about what stamp set would mark the occasion, but didn't really have a 'graduation' stamp as such, so pulled out a retired set called 'Define Your Life' which is a large set with definitions in it (obviously). I then cut out panels of the Designer Series Paper called Beau Chateau- it is a lovely coordinated paper set combining Pink Pirouette, Soft Suede, Very Vanilla and Marina Mist. I added the bird from the Notably Ornate set to add to the design.
It will be bittersweet watching them go off to high school- part of me wishes they'd stay as is forever! It is not to be...
Ness xx

It will be bittersweet watching them go off to high school- part of me wishes they'd stay as is forever! It is not to be...
Ness xx
Friday 9 December 2011
Christmas in Neutrals
I stumbled upon a lady's blog called Stamping Still. Her name is Kathy (don't know her last name) and she lives in Tasmania. She makes lovely cards and I have CASEd 2 of her designs as I loved them so much.


The card above is also CASEd from Kathy@stampingstill. It uses the combination of Almost Navy, Very Vanilla and Crumbcake cardstock. I like the lattice folder for the Big Shot, which gives a look of hessian. Three of the images are from Winter Post, but the swirly leaves are from Pendant Park.
Not many sleeps now 'til Christmas!
Ness xx
Thursday 8 December 2011
Speaking of Reindeers...
As I wrote in my last entry, I am loving the reindeer stamp for the Winter Post set. The reindeer has struck again and I made a few more money folders with it.
We made two of these at my both cardmaking days. It was great fun making cards listening to Christmas songs. Monday night was a funny night as I had 4 people cancel for reasons beyond their control, so it was just my friend Janet and me! She recieved one on one coaching and is now my top student!
 Is this a silly question? What's the difference between a deer and a reindeer, anyway?
Ness
We made two of these at my both cardmaking days. It was great fun making cards listening to Christmas songs. Monday night was a funny night as I had 4 people cancel for reasons beyond their control, so it was just my friend Janet and me! She recieved one on one coaching and is now my top student!

Ness
This Year's Christmas Card
Well, I have finished my Christmas Cards for this year and am thrilled. I would have liked to have sent them out earlier as I like to enjoy looking and the cards that people have sent me. It is a little strange sending homemade cards to other cardmakers, as you feel like you are in some sort of contest with them!
I CASEd this design from stamping Royalty- Tenielle Williams. CASEing is a cardmaking term I learnt this year- it means Copy and Share Everything. From what I can gather, it is ok to copy designs you see on the internet as long as you give the creator credit, I also like to change mine ever so slightly so as to not just do exactly the same thing.
 For this card, I used a stamp set I have just recieved recently which is Winter Post. Yes, everyone knows it doesn't snow here at Christmas, but who doesn't love a reindeer? I have been stamping my reindeer everywhere!
I CASEd this design from stamping Royalty- Tenielle Williams. CASEing is a cardmaking term I learnt this year- it means Copy and Share Everything. From what I can gather, it is ok to copy designs you see on the internet as long as you give the creator credit, I also like to change mine ever so slightly so as to not just do exactly the same thing.

Monday 21 November 2011
Merry & Type

The jury is still out on this card- I just feel something is missing. It actually has a glittery background using the Baroque Motifs Stamp (the florish). I used Dazzling Diamonds Glitter, but I don't think it stands out enough. I am going to try it in red and black glitter next time.
This is another card that we will be making at the Christmas Cardmaking Day in December. This was the first time I had used the Stampin' Up! Heat & Stick Powder. The way you do it is, you stamp onto the cardstock with Versamark, spinkle the Heat & Stick Powder over it, tap it off, heat it with the embossong heat tool, sprinkle glitter on, tap off and then heat again. The Heat and Stick powder is a lot better than just adding glitter. This glitter tends to stay ON the page, rather than flake off.
Stay tuned for different versions of this.
Ness xx
Sunday 20 November 2011
Christmas Glitter Tree

I stamped the En Francais in the background using Crumbcake ink. I wanted it so light that I stamped it onto some scrap paper so it was very feint. I then stamped one of the trees from the Lovely as a Tree set. I got my glue pen and dotted the glue where I wanted the glitter, I then sprinkled the glitter over it, tapped off the excess and there it was.
The ribbon was easy, as I just cut off a small piece and tied it with twine. As for the greeting, the Teeny Tiny Sentiments set came in handy as the Word Window Punch can be used for all of the greetings.
Below was my first attempt, however, I feel it looks a bit 'busy'

Ness
Saturday 19 November 2011
On Facebook again
I have just got back into Facebook again, so I'd love it if you'd be my friend! Haven't got a photo up. Must put photo up...
Look me up Vanessa Cook (Stampness)
Look me up Vanessa Cook (Stampness)
Same Card, Different Colour
I was just loving myself silly when I made my pink butterfly cards for my neice and friend, that I decided to repeat the pattern, only use blue instead. Hmm... I think I like the blue better. What do you think?


Joy

This is one of the cards we made at the last cardmaking day at my house. I originally did this one in navy, but a work friend of mine wanted me to make her some in red. I used Cherry Cobbler cardstock for the background and Whisper White for the embossed part. I embossed the card by putting through the white cardstock in the Vintage wallpaper folder and running it through the Big Shot. I will take a photo of the Big Shot so you can have a look and what it can do.
For the 'Joy' bauble, I stampped it in Versamark (a clear, somewhat sticky 'ink') and poured embossing powder over it. I tapped off the excess and then heated it with something that looks like a hairdryer. After a few seconds it becomes like a shiny enamel.
Monday 31 October 2011
Sophie and Simone's Birthday


Ness
Wedding Gift Card Holder

To make this, Jane used Baja Breeze cardstock (4" x 7") and scored at 1" and then at 4 1/2 ". She then folded it up. The 1 1/2" part becomes the pocket, so she attached 2 light blue brads to hold it together. The En francais background stamp was used on Very Vanilla cardstock using Crumbcake ink. She then inked to edges with Crumbcake, too. She got to try out our brand new lettering stamp set called 'Letter it'. We arranged the letters to read A & T instead of T & A (for obvious reasons!) She used Soft suede ink for that weathered look. We didn't have an 'and' so we improvised and coloured in the 'and' from the Merry and Type set and cut it out and stuck it on top of a couloured in letter! She finished it off with some lovely Baja Breeze seam binding Ribbon and stuck on some pale blue pearls, which I think really make it.
The new technique here, is the way we coloured in part of a stamp with the matching marker and stamped only the word or part of the stamp that we wanted. A special trick is after you have coloured it in, you breathe on it to reactivate the ink before stamping.
Good work, Jane. Your friends will love recieving that on their special day.
Ness
Friday 28 October 2011
Christmas Bingo Card
 -
-This is the first card I have made using the Bingo card Stamp. It didn't quite fit into the standard size card that I usually make, so I tilted it so it fit. We made this at the Girls' cardmaking Day last weekend. They enjoyed making this card the most as they got to have a play with the Jolly Bingo Bits stamp set and choose from the 24 little pictures. I added the word 'merry' from the Tiny Tags set. The greeting is from the ever versatile 'Contempo Christmas' set.
I learnt about 'masking' at the Stampin' Up! Regionals this year. Masking is basically covering up a part that you don't want stamped. If you look behind the bingo card, you can see a florish design. So all I did was cover up the bingo card with Post-it Notes and stamped all over the white part of the card. Removed it and tah-dah! A background!
Thursday 27 October 2011
Christmas Card Making Day- Sunday, 30th October 2011
Christmas is only 58 sleeps away! It always comes around quickly. This is why I am holding one in October, so we can be nice and organised! We will be making 2 each of the below cards, as well as making a gift card holder.

I have 2 spots left for the class, so please come along on Sunday. If you can't make it this Sunday, I will be holding another one called "A very Glittery Christmas" where we will be making 8 cards with a 'glitter' theme. We'll also make some giftcard holders, as you can never have too many of them! The date will be Sunday, 27th November at 1pm.
Ness
Mini Milk Carton
I purchased the mini milk carton a little while ago and have been having fun creating cute little gifts out of it. It is quite small and is designed for small treats such as Jelly Bellies, M&Ms, etc. I made one as a friendship gift. It is really quite versatile as I think you can make it for many occasions such as birthdays, Christmas and Easter. I am going to make a whole lot for Christmas to sit on the table as a little take away gift.

 I used Bashful Blue cardstock and white for the scallopped square and the embosslits die (the butterflies). The strip is 6 3/4" x 1". The measurement is handy as it fits arond the carton perfectly. The secret is to add the sticky strip to the strip and not the carton. Also, put the strip on the 'good' side and wrap around, pinching the corners as you go. I used the Hostess designer paper called cheerful treat. It's really pretty paper.
Ness
PS. Got the mini pegs from the $2 shop!


Ness
PS. Got the mini pegs from the $2 shop!
Tuesday 25 October 2011
'Cheep Talk' friendship card

For the next three entries, I will go through the three things we made at the kids cardmaking day. The first one is made out of the Cheep talk Stamp set. It is retired, but I just love the bird motif. I put a sheet of Melon mambo through the Big Shot with the Square latice folder. It gives a great texture to the card. I then punched the shape with the curly label punch. It doesn't seem to matter which order you do it in. I then used the Ice Cream parlour ribbon and matching buttons. Someone told me that you must never attach 'unthreaded' buttons, so I just threaded them with some natural twine.
Monday 24 October 2011
Kids Cardmaking Day


We had such a lovely day yesterday making cards- it was a frenzy of activity. We made 2 Christmas cards, 2 birthday cards and 2 gorgeous mini milk cartons. I had gone out and bought some of those expensive Jelly Bellies to fill both mini milk cartons. i even measured out 140gms each, but I mistakenly put them in little bags for them to take home to fill later, but before I knew it, they had eaten their whole bag! They had to go home with empty milk cartons.
Here is what we ended up with:
 Ness xx
French Foliage Gift Tag
Last weekend I had to go to a guy's 40th and wanted to give a small gift. I racked my brain and came up with the extremely unoriginal idea of giving a bottle of red wine. I made this tag to dress up the bottle.
I used the new set, French Foliage to make this. There is a little stamp in the set that looks like ink has splattered onto the page, which I really like the look of.


Ness x
I used the new set, French Foliage to make this. There is a little stamp in the set that looks like ink has splattered onto the page, which I really like the look of.


Ness x
Gift Card Holder
Wow! It has been a whole month since I've posted something! I have been in a card making frenzy, now that it is getting close to Christmas.
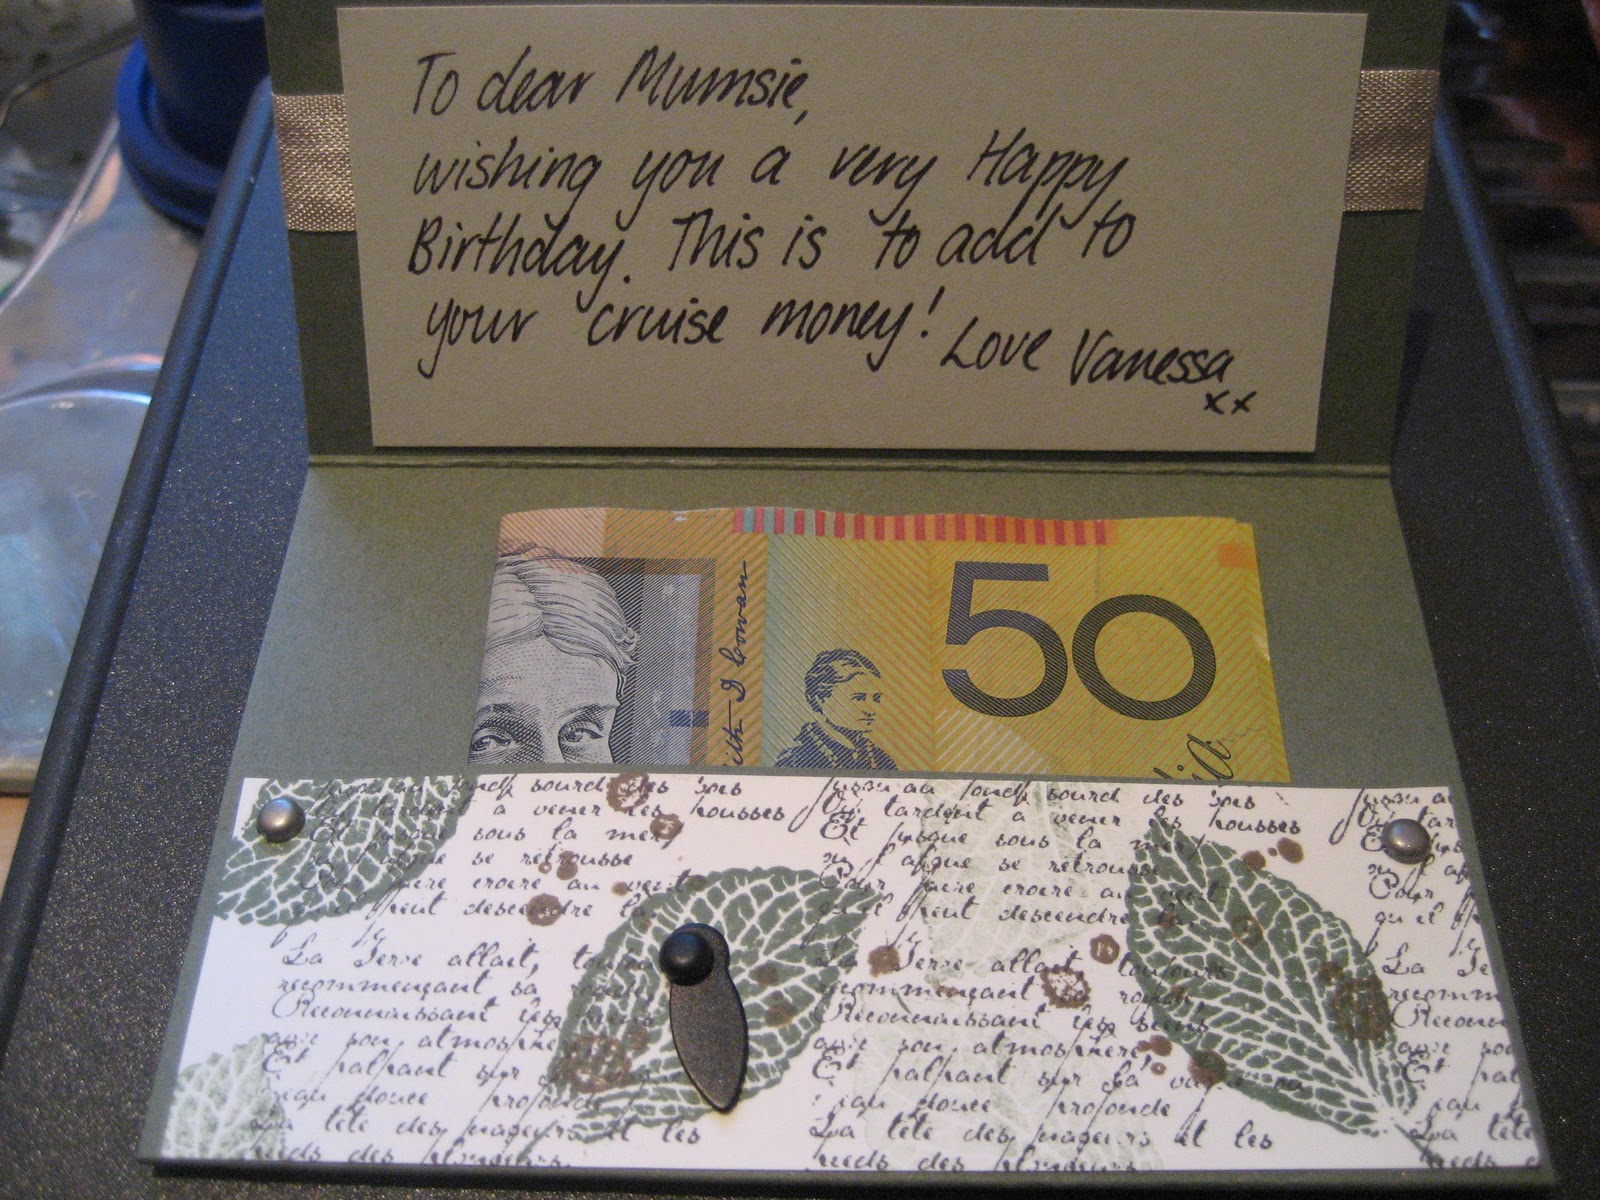
It is my mum's birthday next week so I wanted to make a card for her. All three of her girls are giving her cash so she can spend it on a cruise she is going on in January. I decided to make her a gift card holder and put cash inside it.
To constuct it, I cut the card into a rectangle of 6 1/2" x 4 1/2" (I have started using inches) and the I scored the card at 1 1/2" and at 4". I then folded it into eachother and decorated it. I used brads to secure the pouch at the bottom. I stamped the design using French Foliage and used the colours: Always Artichoke, Early Expresso and Soft Suede.
We will be making one of these at the card making day this Sunday, but with a Christmas theme! See side panel for details.
 Ness x
It is my mum's birthday next week so I wanted to make a card for her. All three of her girls are giving her cash so she can spend it on a cruise she is going on in January. I decided to make her a gift card holder and put cash inside it.
To constuct it, I cut the card into a rectangle of 6 1/2" x 4 1/2" (I have started using inches) and the I scored the card at 1 1/2" and at 4". I then folded it into eachother and decorated it. I used brads to secure the pouch at the bottom. I stamped the design using French Foliage and used the colours: Always Artichoke, Early Expresso and Soft Suede.
We will be making one of these at the card making day this Sunday, but with a Christmas theme! See side panel for details.
The holder is smaller than it looks in the picture, but can fit cash or a gift card perfectly.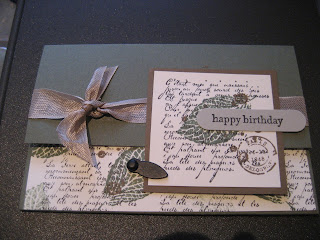

Friday 9 September 2011
New Baby
My cousin had a baby girl the other day and named her Harper (just like the Beckham's and Nataile Bassingwaighte) I pulled out 2 retired sets called In Any Event and Sweetness Unlimited. This is a really simple card to make, but I love the way it looks. I used a combination of Regal Rose and Whisper White and propped up the picture with some Stampin Dimensionals. Super easy!

 Ness
Ness

Thursday 8 September 2011
Birthday Boy
There are so many birthdays in September! I made this card for a boy I tutor. I used the set Party This Way, which has a pennant stamp which fits really nicely with our new Petite Pennants Builder. The Builder is a punch which saves you cutting out each pennant. I used a retired alphabet set called Sweet Shoppe Alphabet to stamp his name. To make the pennants stand out a little, I used some Stampin' Dimensionals.
 Ness
Ness

Tuesday 9 August 2011

I added some pink diamonties to make it sparkle.
Ness
Friday 5 August 2011
Tiling Technique

A tricky card, but I'm sure the person receiving it will love it.
Ness
Thursday 4 August 2011
Using Embossing

I gave this to my friend Alex, who loves this shade of blue.
I bought a car on Monday. I've never had a new one before, so I am very excited about picking up my new bundle of joy! I wonder if I should make a 'Congratulations-on-your-new-arrival' card for myself?
Hmmm.... Ness xx
Monday 25 July 2011
Christmas in Winter Blog Hop with the Inklings!

Welcome to The INKlings’ Team’s Christmas in July blog hop. You may have arrived here from Amy Anderson's blog or just be visiting my blog, whichever way once you’ve checked out my creations you can continue the hop through the link at the end of this post to the next team member.
How quick is this year going! Have you started to think about your Christmas cards and projects yet? The INKlings team has and we thought that this month was the perfect time to host a Christmas in July blog hop. You'll find lots of great ideas provided by 15 team members’ fantastic blogs.
Want to win some Blog Candy? Simply leave a comment on each blog and then email Clare and let her know you’ve done so and you’ll be in the running for a fantastic prize of 15 handmade items plus other goodies.
Sorry Blog Candy prize not available to SU! demonstrators but you're more than welcome to leave us a comment!
I made a simple card for Christmas as you will always need to make more than one! The colours I used were Cherry Cobbler and Always Artichoke. I punched out some circles and put them through the Big Shot machine to get the polka dot and lattice texure. I inked the sides to give them some depth.


Well that’s all from me. Next stop on the INKlings’ Team Blog Hop is my lovely upline,
Michelle Dyson. Have fun and don't forget to leave a comment on each blog to win some great Blog Candy. If for any reason you find a missing link on the blog hop head back here to find links to all the members taking part. After the blog hop is over, I'll pop back in here to convert these to permalinks to the actual Blog Hop posts, so you will be able to do it all over again for inspiration later on!
1. Clare http://www.crafty-cow.com
2. Janice http://www.janicespencer.blogspot.com
3. Christie http://www.christiescreativecorner.blogspot.com
4. Kari http://www.karigail.wordpress.com
5. Joanna http://www.joannawassens.com
6. Michelle http://stampinground.wordpress.com
7. Alana http://www.alanagalagher.blogspot.com
8. Carol http://www.inkantations-and-inkarnations.blogspot.com
9. Cath http://cathdeanpapercraft.blogspot.com
10. Amy http://amyandersonsblog.blogspot.com
11. Vanessa http://stampness.blogspot.com
12. Michelle D http://stampinkpaper.blogspot.com
13. Ryn http://rynscraps.blogspot.com
14. Fiona B http://fionajanestamping.blogspot.com
15. Liz Halbisch http://lizhalbisch.blogspot.com
Friday 22 July 2011
Two-Step Stamping


I wanted to have a play with a Two Step stamp. We have quite a few of these in our current catalogue. You stamp the first image (in this case I used Always Artichoke) and then you stamp the second stamp (which looks like a water colour version of the image) over the top of it. Using the Stamp-a-ma-jig really helps with this. The Stamp-a-ma-jig is this great little tool to help you line up your image correctly, so, if you want to do a continuous pattern or stamp exactly in a certain place, then the Stamp-a-ma-jig is your tool! It's $22.95 well spent. I am really happy with the effect it gives. As you can see, I made a few versions of this card as it can be used for different purposes.
The background is from the Designer Paper range called Newsprint. The stamp is from a Hostess Gift called Fast & Fabulous. It is a set of 6 stamps and is free to the hostess when she hosts a party and the sales are over $600 (also, she would get $60 to spend too!).
Ness
Tuesday 19 July 2011
Strength & Hope

I used the Strength and Hope Stamp Set from the Autumn/Winter Mini. The butterfly is so detailed and pretty. The anntenna was too hard to cut out so I decided to stamp it twice and attach the second image without the anntenna and fold it so it appears that the butterfly has just landed on the page. I stamped the florish from Vintage Vogue and then added glitter to the ends for a bit of sparkle.
The greeting is from the set Sincere Salutations, punched out with Curly Label large. I hadn't used the crimper before, so I've used it for the white strip instead of ribbon.
Ness
Still Love Punch Potpurri

I made this card with the Hostess Gift of Punch Potpurri Stamp Set. This is a great set as it matches the punches that we have: the heart, the bird (not shown) and the little flowers. You stamp the image and then turn the punch upside down so you can see what you are doing. I used the little jewellry tag punch to punch out the tag that says love.
Ness
Sunday 17 July 2011
Another Artistic Etchings birthday

Quick embarrassing story from Melbourne: I used my sister's navy blue BMW to drive to an appointment I had and parked in a 2 hour zone. Went back to the car and for the life of me could not open the doors when I pressed the alarm button. The key wouldn't even fit. I rang my brother-in- law and he said he could come and get me but he would be over an hour. Had to leave a note on the car so I wouldn't get a ticket. I get back to the car and the note had gone and the car was unlocked. It ended up that I had been trying to unlock someone else's navy blue BMW that was parked in front of mine!
Ness
Friday 8 July 2011
Cupcake Punch
Last Sunday a did a 12 year olds party for a good friend of mine. There were 8 girls and they each made a gorgeous mini pizza box as well as a mini card. They made the mini cards using the cupcake punch and they were all gorgeous. I find it very satisfying when you present an idea to someone and the use that as a springboard for their own creation.
![]()
This inspired me to use the cupcake punch to make a card for a girl that I tutor. Very easy card. No instruction needed! Happy Birthday, Amelia!
Ness

This inspired me to use the cupcake punch to make a card for a girl that I tutor. Very easy card. No instruction needed! Happy Birthday, Amelia!
Ness
Tuesday 5 July 2011
Lovely as a Tree

I made this card for my male work colleague (I only have one guy that I work with). To create this I used a stamp set called Lovely as a Tree, which is a beautiful set with very intricate images of -you guessed it- trees! I also used one of my favourite techniques called distressing, which roughs up the edges to give it a worn look. I also tried my hand at using Glimmer mist. It is a spritz that gives it a vintage look too. The risk you take is that you add it as the last step, so if you over spray, it just looks like you've spilt something over the card. As usual I managed to whack some staples on there too.
I have seen this stamp set used as a Christmas stamp, by using a glue pen, putting dots of glue on the tree and then sprinkling glitter over it. You tap it and the glitter attaches itself like tiny baubles- can't wait to try that!
Ness
Friday 24 June 2011
Artistic Etchings Birthday

It is my twin neice's 15th birthday today and I have just finished making a card for them. Ever since they were babies, Ilke has always been the 'blue' twin and Zoe, the pink one! I remember when they were little, if you put food on the wrong colour plate they wouldn't eat it as they thought it wasn't theirs! They have grown since then, but they secretly cling to the idea as they often wear the same style clothes only a different colour.
I made this card using the Artistic Etchings stamp set which I love. The Eiffel Tower is relevant to them as their dad is taking them on a 2 week tour of Europe, darling! Wow. When I was 15, we went camping at Woy Woy for our holidays!
I used Blushing Bride and Baja Breeze cardstock teamed with Very Vanilla. I used my ever-handy Stamp-a-ma-jig to line up the Eiffel Tower in the middle and also the letters from the Sweet Shoppe stamp set. The inks were Crumbcake, Early Expresso, Blushing Bride and Baja Breeze. The background stamp is En Francais.
Better go and wrap their presents.
Ness


Subscribe to:
Posts (Atom)